Image Map

Sunday, January 26, 2014

Dave's Cutter Challenge - Round 1

Remember not long ago when I counted all of my cookie cutters?

And I may or may not have realized that:

A). I have a lot of cookie cutters
B). I possibly have a few that I've never used

SO....to start using those cookie cutters and to make my husband feel better about my habit I developed a game.

And boy is it a fun game.

I'm sure my husband Dave would agree (yes, that was a sarcastic comment).

I'll stop keeping you in suspense and tell you about the new game titled "Dave's Cutter Challenge" and the premiere round.  The rules are simple.  Dave gets to pick three cookie cutters (that he believes I've never used before) and then from those three I get to select one to use.

For the premiere round Dave picked three cookie cutters that he thought I'd never done: a truck - already used, a turtle - used incredibly recently, and a hippo - never used.  So by default the hippo won.

A few days ago on Facebook I had posted the picture you see below...

It is a hippo cutter however Dave thought it was actually a pig.  And after looking at it I totally think it could look like the pig from the Toy Story franchise...

See...tell me I'm wrong...


However, I chose to use it as how it was originally intended - but I made three different drawings.

Hippo #1


Hippo #2

Hippo #3

I was very nervous and thought about throwing them away at this point because it didn't seem that anything was coming together and they resembled grey blobs.


Thankfully after adding some eyes and accents they started to resemble hippos, kinda.  After I was done I was proudly showing them to Dave he said "don't hippos have pink mouths?"

Oh so what. Pink schmink.  White looks totally fine.  And I forgot to add teeth...but I didn't tell him.


Not too shabby. At least it's a practice round on hippos and I'm prepared for a huge hippo order to come my way...because that's really common.


Round 1 complete. Ready for the next challenge of...a monkey.


Thursday, January 23, 2014

It's a Bird, It's a Plane, It's...Lots of Superheros

A little man out in Western Nebraska had his momma ask me if I'd make some superhero cookies that he could take to preschool to celebrate his half birthday.  See his birthday is in the summer, so he misses out on having his special day at school with his friends and teachers.

Enter the fantastic half-birthday celebration.

And what is his favorite?

Why, yes superhero's.  Specifically Superman, however I've been told he's not selective and likes all heroes.

So what goes better with Superman than his friends Spidey and the man of Bats.

That's Spiderman and Batman for you non-Superhero friends.

I dug around in my cutters and came up with these...


You'll recognize the Batman cutter from here.  The Easter egg and square are superheroes.  I swear.  Can't you see it?

How about now?  I had to draw on them - technically it was freehand and even then it was a little off.

Talk about needing to practice my drawing.


Filling in with flood frosting helped to give them some sort of personality.


And even more fill frosting made them even better.


The hardest to do was Spiderman.  Wow.  Lots of little black lines.


Talk about hand cramping.


Hopefully he'll love the final results.  I think they resemble the real Superhero characters.


Happy half-birthday little man!

Friday, January 17, 2014

Cookie Dump

That sounds bad.

Sorry.  As a part of my new year's resolution to get more organized in my cookie life I've been organizing photos on our home computer.  Yikes.  Me messy.

And I've come across stuff I haven't posted.

So here it is.

In no special order with no special reason.

Just cookies.


Thankfully you'll all be happy to know that thanks to a fantastic new year's day sale on Amazon - I bought myself a new Canon 60D camera.  So I love taking photos now.  Lots of photos.  It's fun.

Get ready for lots o'cookie photos.

And now you can sleep easy.

Thursday, January 16, 2014

Da Na Nana Nana Nana...Batman!

Do you know how hard it is to type the Batman theme song?

That was my poor attempt at it.

Very poor.

But I executed decorating Batman cookies much better than "type-singing."

These special Batman cookies are for a very special three year old friend of ours.  We like him.  He's pretty cool.  And he loves my cookies.

Which makes him an even cooler kid in my book.  He knows the way to my heart.

So for his third birthday he asked (well...his mom did but I'm going to pretend he asked) for Batman cookies.  After all it is his favorite superhero.  He was Batman for Halloween.  Pretty big deal.

Nothing is cuter than a small child dressed as a mini-superhero.  Mask and all.

So Batman cookies it is.

But I needed the husband to make me a Batman cutter.  Based on this picture I pulled off of the internet. Thank you Google.


And thank you Dave for making the pretty cutter.


I had to do some drawing on the cookies (instead of taking the time to setup the projector - yes I'm lazy). Don't worry it's not a black sharpie.  It's a food safe marker.  Really.  It is.

I think they look like cats.


Cue my nervousness setting in.

I can't have cat cookies.

The black outline helped.  Sorta.


Filling in made all the difference.  I started to relax.  A little.


I waited overnight for the black flood to dry. Then I used my flesh colored frosting (the word flesh and frosting shouldn't be together in a sentence) to line the bottom of the face.


And flood in with fleshy colored flood frosting...oh and fill in the eyes with white.

See here's where I realize I went out of order in photos.  I flooded the flesh colored frosting and white eyes and let it dry for about 2 hours.  Then I came back and outlined the mask in black.


And to cap it off I used the flesh colored thick frosting to pipe on the facial expressions aka "the Batman frown."  Some call it a stoic look.  I think he's a little frowny.


I guess you have to be frowny to be a super cool superhero.  They can't be bubbly and giddy.

So Batman.  Here you are.  And I hope you'll make Cole a very happy three year old for his birthday.


Happiest Birthday Coley-Coleman-Stinky Pete-Coleosis!!

Don't ask.  The Stinky Pete part is hard to explain.  But it's funny to call him that and all of the other nicknames.

Wednesday, January 15, 2014

Sheaves of What...

Sheaves of Wheat...that's what.

For what?  A luncheon honoring a man who was a farmer in Western Nebraska and one of his main crops were...

...I'll give you one guess...

...it's not hard.

Wheat.

A hard one wasn't it?

I took these back in early December.  So pardon the lack of "in-progress" photos. This was BMNYR - Before My New Year's Resolution.  So this is spotty at best.

I looked at Sugarbelle's wheat sheaf cookies - and attempted to mimic hers.  Imitation is the greatest form of flattery right?

She used a ice cream cone cookie cutter.

I used the green one (aka the one on the bottom in case you're color blind)


And away I mixed "wheat" colored frosting.  A little gold food coloring with a slight drop of light brown.


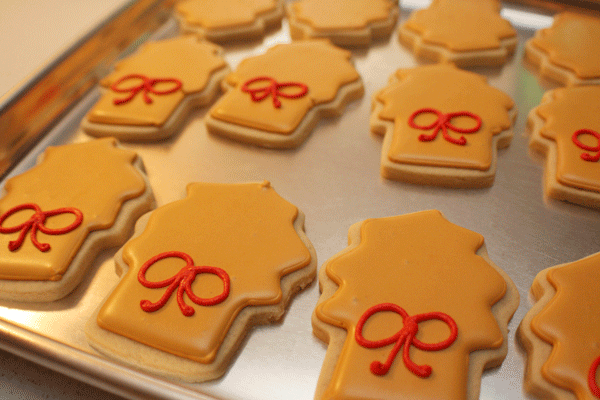
Next were red bows - we are in Nebraska Husker country after all.


And then I forgot to take photos of the step by step t.o make the actual sheaves.  Just imagine photos of me piping frosting in straight lines with little small leaves at the top.

Ta-Da...you get this!


And sheaves of wheat don't look pretty unless they are sitting on some barn wood.  Right?


Hey, I was just keeping with the western farming theme.  Go with it.


Friday, January 10, 2014

Royal Icing - An Update

I've strayed.

And I haven't told you.

I'm sorry.

I modified my old royal icing recipe.  I think this is a lot easier.  Still tastes the same but much much easier. Enjoy....I think you'll love it!


UPDATED Royal Icing Recipe
Ingredients:
  • 2 - 2 lb bags of powdered sugar
  • 3/4 cup of meringue powder (I use AmeriColor brand but in a pinch the Wilton Brand that you can find at places like Michael's or Hobby Lobby works just fine)
  • Liquid to equal 1 1/4 - 1/1/2 cups of the following:
    • 2 tsp. vanilla flavoring
    • 2 tsp. almond flavoring
    • 1 tbsp. light corn syrup 
    • Lukewarm water to fill up to 1 1/4 - 1 1/2 cups of liquid
Supplies:
  • Enough mixing bowls (or cereal bowls) to mix the frosting and food coloring in.  I use one for each color I need.
  • Food coloring - I strongly suggest purchasing the gel kind (not from your grocery store).  The brand I use is AmeriColor - but Wilton works too.  I just like the AmeriColor bottles because they are squeeze bottles. Plus they don't change the flavor of your frosting and have the most brilliant colors!  Click here to see where they sell it in your town!
  • Spatulas or spoons to mix the frosting
  • Squeeze bottles to put the frosting into - think of those red and yellow bottles for ketchup and mustard that you see at restaurants.  I found some at Wal-Mart or Target that would work great.  Or buy actual icing bottles at a store that sells bakery tools!
  • Reusable or disposable pastry bags with tips and couplers (I find mine at a baking store in town)
  • Piping tips #1, #2, #3, #4 and piping bags (disposable are the kind I prefer and ones that are clear). Don’t forget the couplers to connect the tip to the bag. I own 20 #3 piping tips because that way I don’t have to change and clean one out each time I need to do a different color.
  • Saran Wrap
  • Squirt bottle filled with water
Directions:
  • Place meringue powder into bowl of mixer along with both bags of powdered sugar.
  • Turn on mixer slowly to incorporate together (think very slow speed or you'll be wearing it)
  • While the dry ingredients are slowly mixing add in liquid (flavoring, corn syrup and water mixture) and mix on slow until it's all incorporated with the dry ingredients and looks a little runny.  Like a thick soup.
  • After it's all incorporated, turn your mixer onto the highest speed and let it beat together for 8 minutes or until your frosting has formed stiff peaks.  They should be able to stand on their own when you take the beater out of the bowl.
  • Upon mixing everything together you'll notice the frosting is rather stiff. Here's where I make adaptations to fit what I need:

If I need stiff frosting for outlining:


  • I remove the amount of frosting I need from the main mixing bowl and place it into a separate smaller mixing bowl (or cereal bowl). Cover up any extra frosting in the main bowl with Saran Wrap or lid so a crust doesn't form on the top of the frosting. Otherwise you'll have crusty frosting pieces in your good frosting and you'll go crazy!
  • Select the color you want to make, add in the food coloring and mix together with spoon, spatula or whatever your fancy. I normally add in a large amount of frosting, because I’d rather just color my frosting once, no matter if I need a stiff red for outlining, and a more runnier one to fill in my outlines. You’ll see why in a minute.
  • Lay out some saran wrap on the counter, place a blob of the stiff frosting in the middle of the saran wrap.
  • Wrap up the frosting like you would a burrito, so it’s tight and forms a log shape.
  • Put the coupler in a piping bag, and feed one end of your burrito frosting roll down into the piping bag so the end comes through the bottom (where the frosting will come out when you have a piping tip in place). Take scissors and cut off the excess saran wrap sitting out of the end of the piping bag.
  • Place selected piping tip onto end of piping bag filled with frosting burrito roll and secure with coupler.
  • Outline to your heart’s content.
If I need frosting to fill – called Flow Icing:
  • When making your stiff icing, you’ll only put half of it or part of it (depending on the amount of outlining in that color) onto the saran wrap. The rest you’ll leave colored in the bowl.
  • Here you’ll spray about 10 – 12 squirts of water into the bowl. Stir it into the colored frosting. Flow icing should coat the back of a spoon but run off easily. When it drips back into the bowl the drips should disappear semi-slowly into frosting. If it doesn’t do that – and appears stiff – squirt a few sprays into the frosting and mix. Just be careful…you can’t take away water…so squirt carefully.
  • After the flow frosting is at the correct consistency put it into a bottle and frost away.
And that’s it! ENJOY!


Tuesday, January 7, 2014

Happy New Year! (a few days late...)

I can still wish a happy new year even though it's January 7th right?

Riiiiight.

Let's just pretend that I can.  And move onto 2014.

What's in store?  I've been thinking a lot about what I want the coming year to be for cookies.

So I've made a list...(get excited or scroll down and don't pay attention)

2014 I'm-Going-To-Try-To-Do-List
  • Make a complete list of cookie cutters I own (so I stop buying doubles)
  • Make cookies at least 4 times this year for fun - just for me
  • Make videos of decorating to put on the website
  • Work on perfecting my airbrushing technique
  • Develop new flavored cookie recipes for chocolate, pink lemonade, blueberry, & pistachio sugar cookies
  • Attend a cookie conference (CookieCon 2014! - I'm already signed up)
  • Figure out how to make "characters" aka people with faces that don't look morbid!
  • Use at least 15 of the cookie cutters I've bought but never used
  • Work on taking better photos of cookies and the process of decorating - think step by step directions
  • Develop 5 new football cookie designs (for those Husker football weekends)

So who's going to hold me to this?  Anyone, anyone?

I'll leave you with this picture - it's not exciting and it's not of cookies - but I did get the first thing on my list accomplished. 

Making a complete list of all the cookie cutters I own!


Typing them up was another thing.

Yikes.

Here's to an amazing 2014!