Image Map

Wednesday, June 20, 2012

Choo Choo

It's the third and final installment of my Father's Day cookie posts.  And this one is for my uncle.


He loves trains.  Apparently since he was young.  My grandparents took him when he was young to the train yard so he could watch the trains coming and going, engines hooking onto coal cars, cabooses and all things train.

As he got older they use to go to the Am track station in town so he could watch, and announce, the trains coming into the station and heading out.

He's even got a pretty sweet model train and city that is almost complete.  He's been working on it since I was little...and I'm 31 now.  I'd like to credit my aunt in the final push to get the train set complete so I guess she can enjoy these cookies too!

I'd seen an example of these recently...and for the life of me I can't remember where.  So I'd honestly LOVE to give credit where credit is due...I just can't remember.  So if you made these cookies originally PLEASE let me know so I can announce it to the world!

I made square cookies. I believe the original were on rectangles.  However I have NO rectangle cookie cutter.  So square it is.

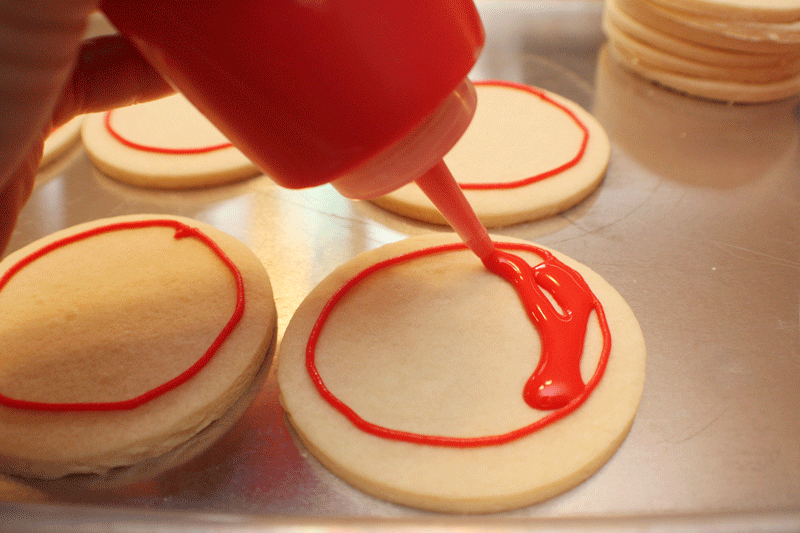
First things first is to outline and flood.  Pretty much how EVERY cookie starts.


Then I grabbed my black thick frosting with a #1 tip.


And I started laying down train tracks.

I feel like I sound as if I'm a musician "laying down beats..."  Anyone?  Anyone?  Is this thing on?


And then the other side.


Magic.  A train track.


Then I piped on a red train - which actually sorta looked like a red blob train.  I'm not sure the red train heads down the real train tracks...but it's an imaginary train.


And because I forgot to take pictures I added on wheels and then the gray smoke.


I used a food marker to write on the train and give it a little detail along with adding some smoke detail.


Hopefully he can enjoy these cookies as much as he enjoyed watching them all those years at the yard.

Tuesday, June 19, 2012

Gone Fishing

Most of the men in my family (both my family and my in-laws) love to fish.

Some more than others...but none the less they enjoy heading out on open water to try their luck.

I decided to make fishing cookies for my father-in-law. 


I started with the fishies.

They are not a particular species.  Or kind.  Or whatever you call it.

They're my made up fish. 


Outlined in a thick forest green color frosting.


Then flooded with the same color flood frosting.


Then I thought I'd make some balloons.


Kidding.  I used a balloon cookie cutter - but thought if I turned it upside down I could use it for bobbers.


Started by outlining the red bottom half.


And filling it in.


Then outlining the white top portion.


And flooding in the top portion with white.


Then I went to bed.  Honestly.  You've got to let cookies dry overnight so you can add on the second layer of details.  That's true for any cookies.

But with the magic of the Internet you don't have to go to sleep to see what happens next.

I added on the white top, outlined the entire bobber in red (see the top left hand bobber) and added on the fishing line.


Ta-Da.


Next I made crayons.

Fish like crayons.


I'm a liar.  I made brown worms on crayons.


Or maybe it wasn't a worm.  It was a fishing pole handle.  And a green rod and reel.


And then the rest of the "stuff."


I wish I would have done an entire white background before I'd added on the fishing pole.  It would have helped the design to stand out.

Oh well...live and learn right?


So Happy Father's Day Don.  I hope you like catching these fish.


I linked this up to:

Sunday, June 17, 2012

A Tale of Two Cherry Pies

My father loves cherry pie.

So much that he'll go buy a cherry pie at Village Inn or from the grocery store randomly, even if there isn't a special occasion.

He prefers it over cake.

Over pretty much any other sweets.  Except for vanilla ice cream and raisins.  Yes, he eats that.  We choose to ignore it.

So I decided that instead of attempting to make him a real cherry pie for Father's Day I'd give him the second best thing, a sugar cookie made to look like a cherry pie.


A circle cookie cutter and some sugar cookie dough makes the perfect base for a cherry pie cookie.

Using my thick frosting in a piping bag I outlined circles (rather sloppy I might add) on the cookies.  I've yet to perfect circles - mine tend to be a little jagged.  Luckily the edges of the circles will be covered up...


Then away I went with flooding the cookies.  For flood frosting I like putting it into "ketchup bottles." The frosting pours out much easier and all the tips have caps to easily store extra frosting.  Not to mention these beauties were purchased at Wally World for roughly $1.00 each...pretty reasonable when I own about 20.


Flood.  Flooding. Floody.


Filling in some of the spots - so it's all evened out. 


Magic.


I wasn't sure how I wanted to add cherries.  So as the red circles were drying I decided to use the thick red frosting and pipe on red dots a.k.a. cherries.


It ended up not being what I wanted....so I just left it knowing the rest of the details would cover it up.  Should I make them again I'd add the cherries as the last detail and do them all over.


I used a Wilton Tip #103 for the "crust."


I started with making the lattice over the top part of the "pie."


It required a lot of thinking...something I wasn't prepared to do.


I thought that most cherry pies I'd ever had also had a sugary top - with the Turbinado Sugar I had at home I quickly spread it over the top of the wet frosting. 


Now here's the messy part.  And where the title of this post comes into play.  I ran out of the light tan frosting...and also didn't have enough white extra frosting to make more.  I had to use the dark brown frosting that was on hand...and it was runny.  Enough that it looked like the pie crust was burned.


But I ended up giving him both the pretty looking cookies and the "burned "version.  They still taste the same...unlike a real burned pie.


I'd like to revisit this cookie "Cherry Pie" attempt because I'd give this a B-. 

I'm looking to get an A+.


I linked this up to:
LilaLoa

Wednesday, June 13, 2012

SURPRISE...

We had a party.

But not just any party.

It was a party to celebrate Dave's birthday.

Everyone knew about it...except for Dave.

Surprise.

I had lied to him, actually I told many many lies.

White lies.  But lies none the less.

And I'm happy sad to report that I'm really good at lies.

So good in fact that Dave "the super sleuth" didn't have any idea.

It started with a lie I told him around a month ago that a co-worker had asked me to make sugar cookies and cupcakes for their son's birthday.  This fictional co-worked had told me that her fictional son liked to fish (shockingly so does Dave) and wanted fish sugar cookies and fishing themed cupcakes.

How crazy.

Right?

That's how I was able to make the sugar cookies and cupcakes right under Dave's nose.

Ah ha ha ha (*evil laugh*).

I made fish cookies (and forgot to take pictures of the fish cupcakes)...


Talk about carpal tunnel.

Those little white dots on the fish are my nemesis.

I cursed myself after I did the first one and liked it THEN realized that I had three trays to do of roughly 40 fishes.

BUT even though my hand and wrist is ready for a cast...I still think they turned out pretty great!

Sunday Funday CARS Style

Yesterday we had overselves a little Sunday Funday. 

First, because it was Sunday.  And the activities were fun.

Fun, fun, fun.

It involved a three year old birthday party. 

Complete with a Cars theme, mini bounce house, pizza, pop, presents and cookies.

I made the cookies.  I'm not 100% happy with them.  More like roughly 60% happy.  But the three year old and other young guests at the party enjoyed them I believe.  Which is what it was all about

Monday, June 11, 2012

The One & Only: Frosting

Just like my sugar cookie recipe I only use one frosting recipe. I just morphed it a little depending on what I need. But to start - here's the basic frosting for the sugar cookies.

The One & Only Frosting Recipe
Ingredients:
  • 2 lb bag of powdered sugar
  • 10 tbsp. Meringue Powder (I find the Wilton Brand available at speciality stores or your local Michael's is good)
  • 1 cup water
  • 1 tbsp. milk (any you have on hand)
  • 1 tsp. lemon juice
  • 1 1/2 tsp. vanilla
  • 2 tbsp. butter (salted sweet cream) melted
Supplies:

  • Enough mixing bowls (or cereal bowls) to mix the frosting and color together in. I use one for each color I need
  • Food coloring - I strongly suggest purchasing the gel kind (not from your grocery store). The brand I use is AmeriColor. It doesn’t change the flavor of your frosting and mixes the best and most brilliant colors.  Click here to see their website - and find places that carry it in your town!
  • Spatulas and spoons to mix colors
  • Ketchup bottles like you see at a old-fashioned diner. Like this:

  • Piping tips #1, #2, #3, #4 and piping bags (disposable are the kind I prefer and ones that are clear. Don’t forget the couplers to connect the tip to the bag. I own 8 #3 piping tips because that way I don’t have to change and clean one out each time I need to do a different color.
  • Saran Wrap
  • Squirt bottle filled with water
Directions:

1. Place 10 tbsp. meringue powder into mixing bowl of mixer. Add in 1 cup water. Beat on high until stiff, normally around 8 minutes. Stop when peaks can stand on their own.

2. Add in powdered sugar, melted butter, vanilla, lemon juice, and milk and mix until everything is combined.

3. Upon mixing everything together you'll notice the frosting is rather stiff. Here's where I make adaptations to fit what I need:


If I need stiff frosting for outlining:

  • I remove the amount of frosting I need from the main mixing bowl and place it into a separate smaller mixing bowl (or cereal bowl).
  • Select the color you want to make, add in the food coloring and mix together with spoon, spatula or whatever your fancy. I normally add in a large amount of frosting, because I’d rather just color my frosting once, no matter if I need a stiff red for outlining, and a more runnier one to fill in my outlines. You’ll see why in a minute.
  • Lay out some saran wrap on the counter, place a blob of the stiff frosting in the middle of the saran wrap.
  • Wrap up the frosting like you would a burrito, so it’s tight and forms a log shape.
  • Put the coupler in a piping bag, and feed one end of your burrito frosting roll down into the piping bag so the end comes through the bottom (where the frosting will come out when you have a piping tip in place). Take scissors and cut off the excess saran wrap sitting out of the end of the piping bag.
  • Place selected piping tip onto end of piping bag filled with frosting burrito roll and secure with coupler.
  • Outline to your heart’s content.
If I need frosting to fill – called Flow Icing:

  • When making your stiff icing, you’ll only put half of it or part of it (depending on the amount of outlining in that color) onto the saran wrap. The rest you’ll leave colored in the bowl.
  • Here you’ll spray about 10 – 12 squirts of water into the bowl. Stir it into the colored frosting. Flow icing should coat the back of a spoon but run off easily. When it drips back into the bowl the drips should disappear semi-slowly into frosting. If it doesn’t do that – and appears stiff – squirt a few sprays into the frosting and mix. Just be careful…you can’t take away water…so squirt carefully.
  • After the flow frosting is at the correct consistency put it into a ketchup bottle and frost away.
And that’s it! ENJOY!

Sunday, June 10, 2012

The {Secret} Cookie Recipe

I don't know if I'd call it a secret.

I actually got the sugar cookie recipe off the back of a gift.  The gift was a copper cookie cutter and the tag had a recipe for sugar cookies.  I copied it down only because it was so simple. 

And it morphed into the only sugar cookie recipe I use.

So after a lot of people have asked me for it and I've memorized it and can recite it on command I thought I'd put it down for others to enjoy.  Especially since the Valentine's season is upon us.  I'm sure everyone wants to make sugar cookies for that holiday.

Everyone I know will just be waiting for me to make them.

Back to the recipe at hand - here it is!

Simple Sugar Cookie Recipe

Ingredients:
2 sticks butter (1 cup) - I prefer salted sweet cream butter
2/3 cup sugar
1 egg
1 tsp. pure vanilla extract
2 1/2 cups flour, sifted

Directions:
1. Cream butter in mixer, then add in sugar and mix together.
2.  Add in one egg and mix together until combined
3. Add in vanilla a mix together until combined
4. Add in sifted flour and mix until combined.  Dough should pull away from the mixer walls and form a ball.  If it doesn't add in a little more flour (2 tbsp at a time) until it's ball form.
5.  Remove from mixer and wrap in saran wrap. I find it's easier to form the dough into a log form before wrapping up.
6.  Store in refrigerator for at least 4 hours up to overnight.
7.  When ready to bake, take out of fridge, roll out dough and cut with cookie cutters.
8.  Bake 10-12 minutes at 350 degrees.  Remove from oven when you see just a hint of tan on the cookie.


I promise you, it's incredibly simple.  I find that using the best vanilla really makes a difference.  Same with good butter and flour.  Good ingredients yield GREAT cookies!

Next up the frosting recipe!